
Userbrain works with any prototyping tool, that allows you to share a public link. Simply put, if you can link to it, you can test it.
We'll now guide you through the steps of user testing your InVision prototype with Userbrain.
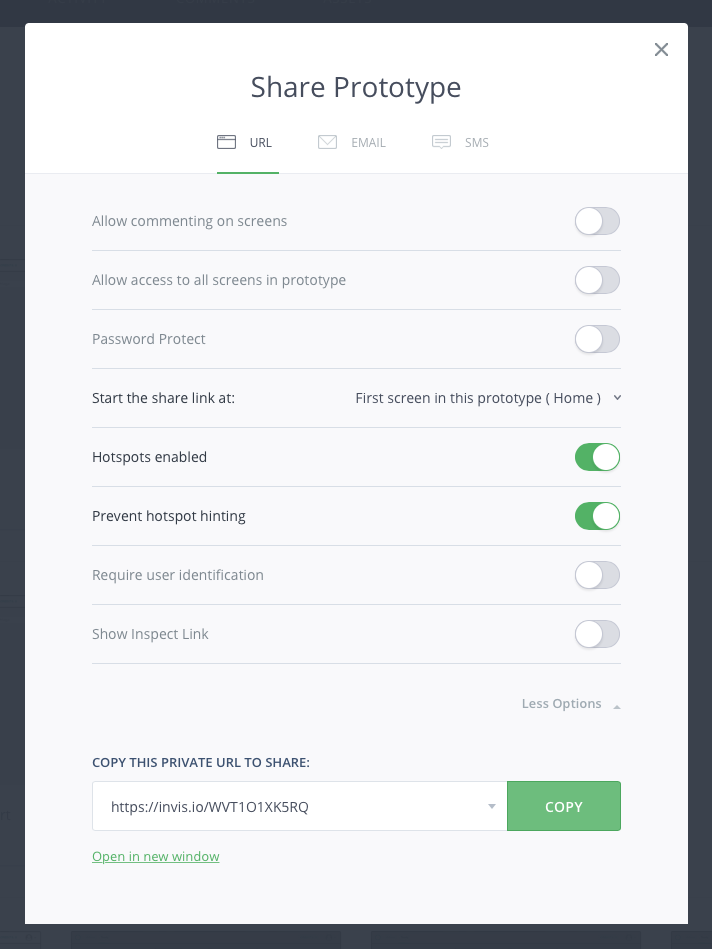
The perfect settings to test your InVision prototype with Userbrain
- Open the prototype you'd like to test in InVision.
- Click the green share button at the top right of your dashboard
- Click on «Link Settings« at the bottom of the box
- Click on «More Options« above the green copy button
- Make sure that «Start the share link at« is set to the page you'd like participants to start on.
- Enable «Prevent hotspot hinting« and «Hotspots enabled« and disable all the other option.
- Click on the green copy button and paste this URL into Userbrain
Some more good tips to test your InVision prototype with Userbrain:
Why you should disable «Comment Mode«
This option enables people to provide feedback on the prototype. As this feature might be useful, if you want to share your prototype with your team or your customers and gather input from them, this option sometimes distracts testers from their task.
Testers won't recognize that this option isn't an actual part of your prototype, And you won't spend valuable time watching a tester explaining InVision functionality to you.
Our suggestion, therefore, is disabling the «Allow commenting on screens« option if you're testing your InVision prototype with Userbrain.
Disable «Hotspot Hints«
When user testing your prototype, you don't want to influence the user experience by highlighting certain elements to them.
But if the »Hotspot Hint« option is enabled, anytime a user clicks in an area that is not interactive, the areas that are interactive are outlined thus indicating clickable areas.
By disabling the «Show hotspot hint« option in InVision, you make sure that you don't interfere with the user experience.
Ready to start your user test of your Invision prototype? Setup your Invision prototype test here